• Members 159 posts
    April 29, 2023, 8:48 p.m.

    Some time in 2004, I bought my first DSLR. It was the Nikon D70. I still have it. A few years back, I had it converted to infrared, and I still use it today.

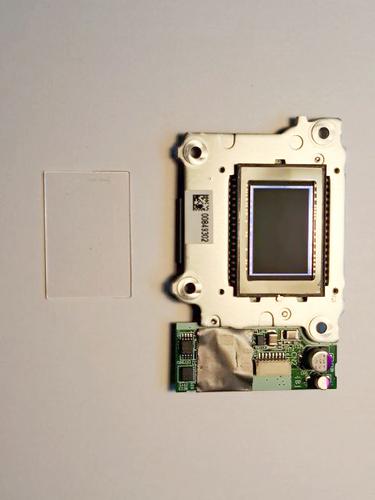
    Now, I have the yen to use a straight monochrome DSLR. Problem is, they are too rich for me! So, I thought maybe I could convert a D70 to monochrome. I guess it can be done, here is some information: Debayering Nikon D70 sensor

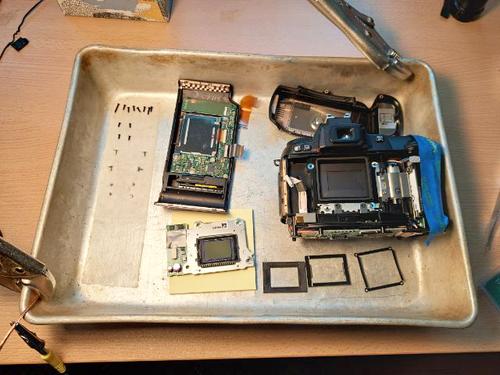
    Since I don't want to destroy my working D70, I have purchased one from the big trading site for $35.00 plus shipping. I got it today, and it really works! Here are a few quick images made with it.

    www.gophotog.org/allphotos/summerville4/large_photos/DSC_0014_CO.jpg

    www.gophotog.org/allphotos/summerville4/large_photos/DSC_0016_CO.jpg

    www.gophotog.org/allphotos/summerville4/large_photos/DSC_0022_CO.jpg

    I have instructions for the disassembly of the D70 here: Nikon D70

    I'm not sure when I can get to this, or if I will be successful, but I think if I can find the time, it should be fun!

  • Members 159 posts
    May 10, 2023, 4:54 p.m.

    I've been gathering supplies.

    An electrostatic wrist strap: Wrist Strap

    An assortment of screwdrivers (from 0.8mm to 3mm): Screwdrivers

    Fine point tweezers: Tweezers (For removing cable ends.)

    Heat gun: Heat Gun (For breaking the epoxy glue bond of the sensor cover glass.)

    Electronic grade compressed air: Compressed Air

    End Mill cutting heads: End Mill

    In removing the Color Filter Array from the sensor, most DIY people use sharpened sticks or plastic to scrape it off. In the process, they tend to scratch the surface of the sensor. The businesses that do this, appear to use milling machines. I do not have one, but I have a very precision drill press that I think I can modify to work as one. Most of the small milling machines can be set for speeds of 0 to 5000 rpm. My press has a top speed of 3860 rpm. I plan on making a movable jig that the sensor will be attached to that will limit the cutting to the surface of the CFA. So, that is the theory!

  • Members 159 posts
    May 19, 2023, 5:24 p.m.

    image000002.jpg

    Today, I tore the D70 apart. Next step is to remove the cover glass from the sensor. That should be fun! It involves scraping around the glass with a sharp blade to remove any epoxy glue residue, and then using the heat gun to break the epoxy glue bond of the sensor cover glass. I've heard it can take many hours. You have to do it in stages, because the sensor is attached to a PC board with many components. The sensor and / or the PC board can be damaged if you heat it for too long at one time.

    image000002.jpg

    JPG, 239.4 KB, uploaded by joman on May 19, 2023.

  • Members 159 posts
    May 27, 2023, 6:33 p.m.

    image000003.jpg

    I managed to get the cover glass off in one piece. It did not take as long as I thought it would. (Well elapsed time was a few days, but I put it aside for a while.) I heated the cover glass with a heat gun for five minute periods for about 1-1/2 hours. This was at a temperature of something over 200 C. (The heat gun does not show any sort of scale, and my digital thermometer only goes to 200 C.) At that point, only the corners seemed to have some separation. I chose to stop for the night.

    I did not get back to the project for a few days later. When I did, I decided to scrape around the glass with a sharp single edged razor blade again before using the heat gun. With the first amount of pressure of the blade against the glass, it popped off! So, I guess the heat gun had done its job the first time, and the only thing that was needed was a little mechanical activity to complete the process.

    Now to go on to the next step, and design and build a jig to use in milling the CFA off the sensor.

    image000003.jpg

    JPG, 134.6 KB, uploaded by joman on May 27, 2023.