• Members 480 posts
    April 22, 2023, 10:40 a.m.

    Here is a portrait with large bokeh balls in the background (from Wikimedia):
    Eliana_with_bokeh.jpg

    The size of the bokeh balls in the background of a shot like this is determined primarily by the size of the lens aperture, technically known as the entrance pupil. The diameter of the entrance pupil is the focal length divided by the F-number. The photograph above was taken with a 135mm lens at f/2. The F-number is 2 and the entrance pupil is 135/2 = 67.5mm.

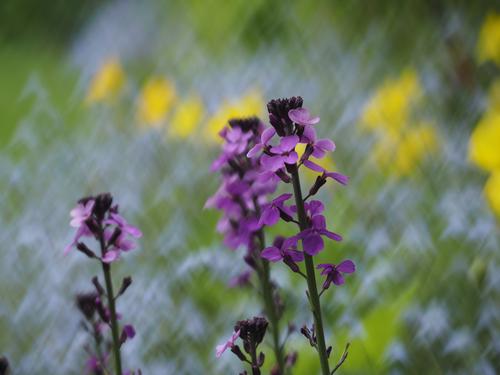
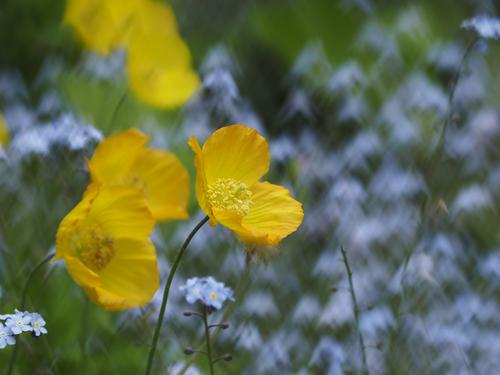
    If the background is distant (say, at least ten times as far away as the subject), then the bokeh balls from bright points of light in the background will be approximately the same size as the entrance pupil, i.e. 67.5mm for this example. The size is measured on the same scale as the subject (on which the camera is focussed). With human faces, the inter pupillary distance (from the centre of one eye to the centre of the other) averages around 62mm for women and 64mm for men. This gives a very approximate idea of the scale on which to measure the blur size.

    For any camera lens on any camera, the maximum size of the bokeh balls produced by points of light in the background is always equal to the diameter of the entrance pupil, which is the focal length divided by the F-number (also called the F-stop or simply the aperture). The maximum size bokeh balls will occur If the background is at infinity. In practice, this means more than about ten times as far away as the subject. The closer the background is to the subject the smaller will be the bokeh balls and, in general, the less blurred will be the background.

    I haven't mentioned subject distance because it is not relevant to the maximum size of the blur. For a background at infinity, the size of the blur remains the same relative to the subject whatever the distance from subject to camera. As the subject moves further away from the camera, the size of the subject in the frame reduces and the size of the blur reduces in proportion.

    Entrance Pupil

    The entrance pupil is the hole that you see when you look into the front of the lens. The light entering that hole is used to form the image on the sensor. Light rays that do not enter the entrance pupil hit the edges of the internal elements of the lens and do not play any part in forming the image.

    20220722-082748 small.jpg
    From left to right: 12mm f/2.8 EP=4.3mm; 45mm f/1.8 EP=25mm; 75mm f/1.8 EP=42mm; 25mm f/1.4 EP=18mm; 9mm f/4 EP=2.2mm (the zoom lenses are at the short end of the zoom).

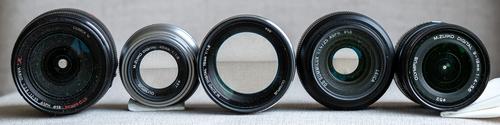
    For wide-angle lenses in particular the front element of the lens is often much larger than the entrance pupil.

    See the next post for details of how to calculate the size of the blur for any background distance and any subject distance.

    20220722-082748 small.jpg

    JPG, 541.0 KB, uploaded by TomAxford on April 22, 2023.

    Eliana_with_bokeh.jpg

    JPG, 1.6 MB, uploaded by TomAxford on April 22, 2023.

  • Members 480 posts
    April 22, 2023, 10:40 a.m.

    Calculating the size of the blur for any background (or foreground) distance

    When light enters the lens, each different point on the surface of the lens "sees" the scene from a slightly different perspective. These slight differences in perspective cause objects that are not in the plane of focus to be blurred.

    Consider the diagram below. Suppose that the camera is focussed on the subject (assumed to be in a plane) so that the sensor records a sharp image of the subject, but objects away from the subject plane will be blurred to a greater or lesser degree.

    Screenshot 2023-04-22 at 11.43.42.png

    Point P is in the background. Consider how P is seen relative to the subject, when viewed from the entrance pupil of the lens. Seen from point T, P is in line with Q. Seen from point U, P is in line with R. From intermediate positions across the entrance pupil, P is in line with points in between Q and R.

    When all those views are combined together, the point P appears as a blur, which extends from Q to R. So the distance from Q to R (labelled b in the diagram) is the diameter of the blur disk produced by a small bright light at point P.

    A similar thing happens with the point S in the foreground. Viewed from T, S is in line with R. Viewed from U, S is in line with Q. So in the integrated view seen by the whole entrance pupil, S appears as a blur from Q to R.

    It is a matter of simple geometry to work out the size of the blur in terms of the distances x and y:

    b = ax/y

    where:
    b is the diameter of the blur in the subject plane,
    a is the diameter of the entrance pupil,
    x is the distance from point P to the subject plane,
    y is the distance from point P to the entrance pupil.

    The same formula applies whether P is in the background or in the foreground.

    Screenshot 2023-04-22 at 11.43.42.png

    PNG, 62.9 KB, uploaded by TomAxford on April 22, 2023.

  • edit

    Thread title has been changed from How much background blur (bokeh) will I get?.

  • Members 133 posts
    May 14, 2023, 4:27 p.m.

    Do you do this math when choosing a lens or when you take a photograph? I don’t understand how to apply this when taking a photo, compared to, perhaps, looking through the lens or reviewing the photo right after shooting it.

  • Members 480 posts
    May 14, 2023, 6:02 p.m.

    I cannot imagine anyone would be crackpot enough to go through the maths every time they took a photo, or even when choosing a lens!

    Do you go through the maths needed to work out how much torque is transmitted through the gearbox of your car every time you drive somewhere?

  • Members 878 posts
    May 14, 2023, 10:17 p.m.

    [deleted]

  • Members 360 posts
    May 15, 2023, 1:32 p.m.

    Not that I did exactly this, but I am this kind of crackpot when chosing gear. I do a lot of math on products to determine most performance potential. Especially with speakers, but also with cameras and such.

    This one is most helpful and will bookmark it.

  • Members 133 posts
    May 15, 2023, 3:55 p.m.

    I tried to read this, but I still don't understand. For instance, if we look at 135mm f/2.0 and 85mm f/1.2, we get bokeh ball sizes of 67.5mm and 70.8mm. So it seems the 85mm will give me bigger bokeh balls.

    But the thing I don't understand is that a full frame sensor is only 24x36mm. So the 70mm bokeh ball is 70mm of... what?

  • Members 511 posts
    May 15, 2023, 5:17 p.m.

    Did you miss the "ruler as focused subject" posts? They explain it all. The OOF disk size from a point of light at infinity (or optically near infinity) is as measured against the focused ruler. If you want the size on sensor, then you're going to have to include magnification in the focus plane in your calculations.

  • Members 480 posts
    May 15, 2023, 5:27 p.m.

    The size is the size measured on the same scale as the subject. Imagine that your subject was holding a ruler. The bokeh balls have to be measured by that ruler.

    If you want the size of the bokeh ball on the sensor, you need to multiply by the image magnification.

  • Members 133 posts
    May 15, 2023, 5:29 p.m.

    No, to be honest I didn’t see “ruler” in his post and I don’t understand this, although I assume it is correct.

    I’m not trying to make fun of any of it, I’ve been asking in sincerity how photographers are supposed to apply it. I can see that the 85mm f/1.2 has a bigger bokeh potential than a 135mm f/2.0, but I don’t understand how to apply the information here into a visualization of the difference.

    Maybe because it’s been decades since I’ve taken geometry. But, for me, I like to understand when something has a mathematical or theoretical benefit, but since this is photography I try to understand the visual benefit. DPReview was often very good at that.

  • Members 133 posts
    May 15, 2023, 6:32 p.m.

    Ohhhhhhhh. Now I see.
    Sorry… some gumball machines need to get shaken harder until a gumball comes out.

  • Members 480 posts
    May 15, 2023, 6:39 p.m.

    No need to apologise. I think we all find some things are impossible to understand until something suddenly clicks into place. I think I misunderstood your first post, which didn't help. The confusion of trying to communicate via brief text messages!

  • Members 133 posts
    May 16, 2023, 1:26 p.m.

    I still don’t fully understand the geometry of it all… but I understand the idea of dividing focal length by maximum aperture.

    Over the years, I’ve learned many photographic techniques and tricks. They’re all arrows in my quiver. I think we’re all like this. I still think that, from a Beginner perspective, it’s worth asking “How does the photographer use this info when he’s shooting?” And if the answer is, “You don’t, you use it when selecting a lens,” that’s ok. But I think it’s always important to ask how something helps is take better photos.

  • Members 480 posts
    May 16, 2023, 2:46 p.m.

    I think a knowledge of the results (e.g. that the maximum background blur size is equal to the entrance pupil) is useful both when choosing lenses and sometimes when planning the best way to take a photo.

    On the other hand, detailed knowledge of the geometrical optics (needed to understand why the blur size is what it is) is not necessary at all. But it may be of great interest to those with a curiosity about such things and sufficient background knowledge to be able to understand my explanation.

    I included a diagram and explanation of the geometrical optics mainly because it relatively simple to understand (for those versed in geometrical optics), yet it is rarely included in online tutorials or common textbooks on photography. However, anyone can use the formula for the size of a bokeh ball without necessarily understanding the optics behind it:

    If the bokeh ball is produced by a small bright light in the background:

    bokeh ball diameter = entrance pupil x distance from background to subject / distance from background to camera,

    the size being measured at the subject, not on the sensor.

  • Members 435 posts
    May 16, 2023, 9:10 p.m.

    There's some very clever work being done with Bokeh examples right here in this forum, I'm surprised someone hasn't linked to it yet, so I will.

    So for excellent results take a look

    dprevived.com/t/adapted-lenses-with-interesting-bokeh-shapes/3094/

    Very interesting to see the results from older lenses by some experts in there.

    Danny.

  • Members 480 posts
    May 17, 2023, 6:27 a.m.

    Shaped Bokeh

    It is easy to create your own shaped bokeh with a suitable lens. You need a lens with a reasonably large entrance pupil, say 25mm or more. My best lens for this is a 75mm f/1.8 with an entrance pupil of 42mm. You then cut a hole of whatever shape you want in a piece of black paper, aluminium foil, etc. The hole must be smaller than the entrance pupil of the lens. Then hold the paper with the hole in it in front of the lens while you take the shot. The closer it is to the front of the lens, the better it will work.

    For examples and more tutorials on how to do this, just do an online search for "shaped bokeh".

  • Members 480 posts
    May 17, 2023, 10:44 a.m.

    Shaped Bokeh - Examples

    My home-made shaped aperture fixed to the front of the lens. The apex of the arrowhead faces upwards when the lens is attached to the camera.
    _5170496.JPG


    Photos taken with that lens and home-made aperture

    _5170494.JPG

    _5170493.JPG

    _5170492.JPG

    _5170482.JPG

    ... Just to illustrate how the shaped bokeh change the appearance of the out-of-focus areas of the picture.

    Putting a home-made aperture in front of the lens effectively makes that aperture into the entrance pupil of the camera (provided that your home-made aperture is smaller than the entrance pupil of the lens).

    _5170482.JPG

    JPG, 1.7 MB, uploaded by TomAxford on May 17, 2023.

    _5170492.JPG

    JPG, 1.7 MB, uploaded by TomAxford on May 17, 2023.

    _5170493.JPG

    JPG, 1.7 MB, uploaded by TomAxford on May 17, 2023.

    _5170494.JPG

    JPG, 1.7 MB, uploaded by TomAxford on May 17, 2023.

    _5170496.JPG

    JPG, 1.7 MB, uploaded by TomAxford on May 17, 2023.