• Removed user
    Oct. 5, 2023, 3:16 p.m.

    My personal preference is to start with raw data, avoiding the steps of transforming to RGB then converting "back" to Grayscale.

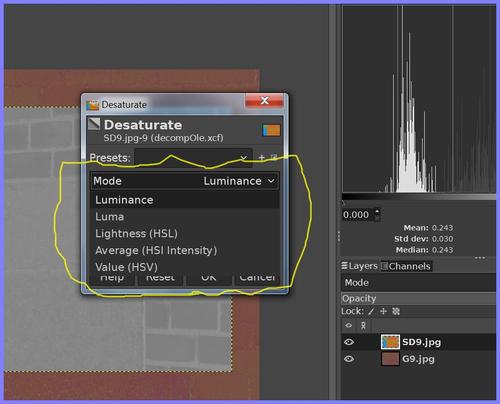
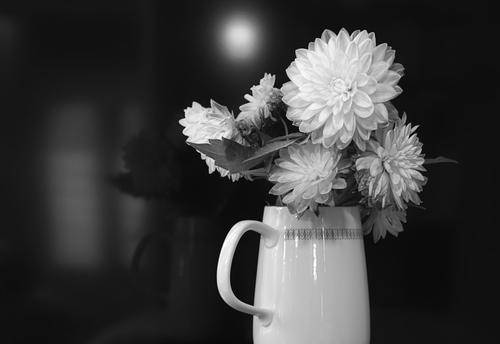
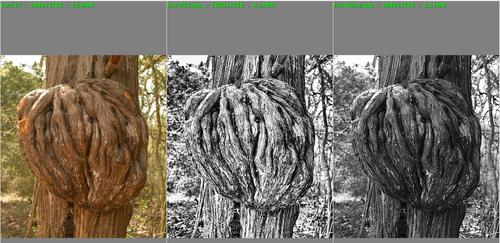
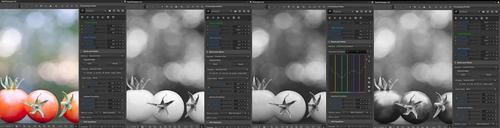
    But many prefer to convert color images to grayscale. There are many ways to carry out that transformation and a few are usually offered in most Editors. However, those many ways can have quite different results, for example:

    Cadik

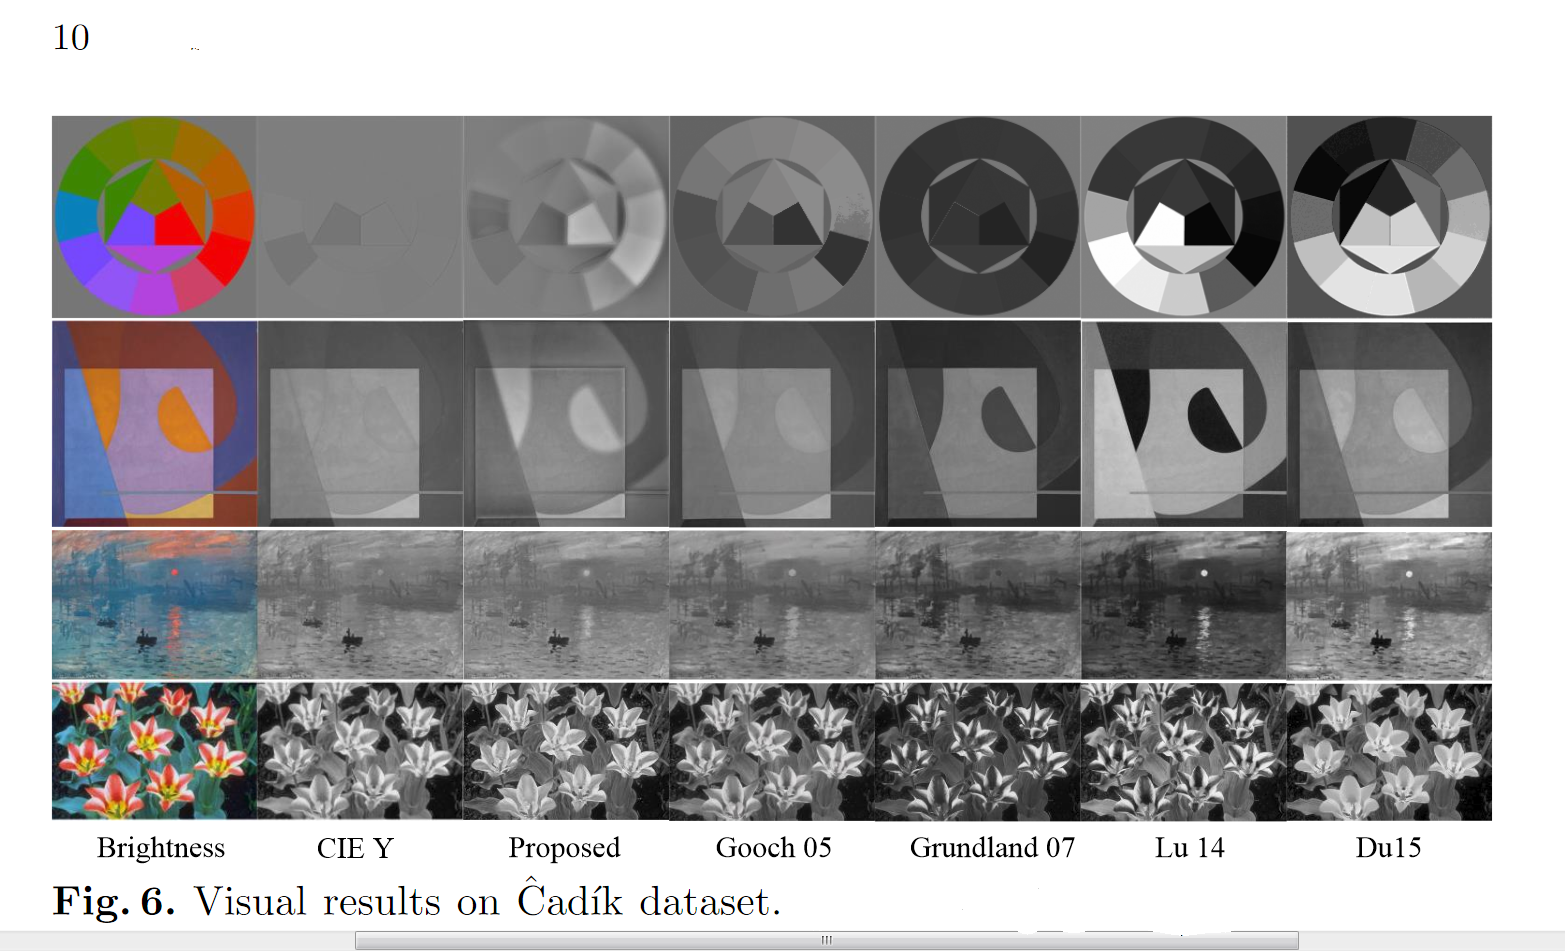
    Notice how bad the ever-popular Luminance method (CIE Y) is compared to the others!

    Which method above do you like and what method(s) do you use personally?

    The full paper by Martin Cadik et al can be seen here:

    cadik.posvete.cz/color_to_gray_evaluation/

    Takes a while to download - many, many images!

  • Oct. 5, 2023, 5:30 p.m.

    Interesting stuff, thanks for pointing!

    Unfortunately most methods, displayed on linked site and in paper there, give strange results, which do not correspond to my perception. Black flower from orange one? No way.
    And your "Fig .6." above - I didn't find that there? "Proposed" column looks almost good, others not.

    What about my workflow - I have no idea, which method I'm using to create (very rare) B/W images :) I have one old tool (called RAW PhotoStudio, although I use it with 16bit tiff files only), which among other parameters allows modify color balance in very broad range and at the same time convert image to grayscale - I usually set it into grayscale (or sepia) mode and play with color sliders until I get acceptable result. Or more often not :)

  • Removed user
    Oct. 5, 2023, 6:30 p.m.

    I understand, Arvo,

    Fig 6 came from a different paper by Cadik & Co. Can't find a link right now.

    Here's the GIMP choices for simple de-saturation which I use for quick work:

    C2G-GIMP.jpg

    The GIMP has some more drastic methods buried in my G'MIC plug-in ...

    I don't know where all those fancy Cadik-tested methods can be found.

    C2G-GIMP.jpg

    JPG, 251.1 KB, uploaded by xpatUSA on Oct. 5, 2023.

  • Members 2085 posts
    Oct. 5, 2023, 8:49 p.m.

    guess what method i use 😁😜

    sA7M00729print (2023_06_09 21_10_28 UTC).jpg

    sA7M00718print (2023_04_06 20_18_00 UTC) (2023_10_04 03_31_02 UTC).jpg

    sA7M00729print (2023_06_09 21_10_28 UTC).jpg

    JPG, 5.4 MB, uploaded by DonaldB on Oct. 5, 2023.

  • Removed user
    Oct. 5, 2023, 9:59 p.m.

    film

  • Members 878 posts
    Oct. 5, 2023, 10:44 p.m.

    [deleted]

  • Removed user
    Oct. 6, 2023, 12:12 a.m.

    thanks for sharing

    oh

  • Members 300 posts
    Oct. 10, 2023, 6:21 a.m.

    Very nice pictures. I guess in camera conversion to B&W.

    It's a good method if you want to see B&W pictures in your camera's back screen. But that method converts jpegs only.
    If you are going to edit your photos later you have to shoot RAW+jpg. So you have a jpg for preview in b&w and an editable raw to make your picture.

    There's many useful methods in RawTherapee to convert raw to grayscale, btw. This one converted in RT.

    flowers_bw.jpg

    flowers_bw.jpg

    JPG, 125.6 KB, uploaded by TimoK on Oct. 10, 2023.

  • Removed user
    Oct. 10, 2023, 10:34 a.m.

    Also, there's a few in the GIMP:

    compC2G-Value.jpg

    As can be seen in the middle, their Color To Gray is a bit fierce! The other one is by HSV Value, which often works well compared to Luminance.

    compC2G-Value.jpg

    JPG, 1.3 MB, uploaded by xpatUSA on Oct. 10, 2023.

  • Members 300 posts
    Oct. 10, 2023, 11:30 a.m.

    I seldom make grayscale pictures because I love colours so much. Sometimes I still do.
    I used Channel Mixer in Photoshop to bw conversions.
    This is monochromatic channel mixer in GIMP. It's called Mono Mixer.

    flowers_bw_monomixer.jpg

    flowerscolor.jpg

    flowers_bw_monomixer.jpg

    JPG, 108.8 KB, uploaded by TimoK on Oct. 10, 2023.

    flowerscolor.jpg

    JPG, 172.1 KB, uploaded by TimoK on Oct. 10, 2023.

  • Removed user
    Oct. 10, 2023, 11:54 a.m.

    Thanks, I gave that a shot - lot of green and reduced red followed by default Unsharp Mask:

    burlMixer.jpg

    burlMixer.jpg

    JPG, 2.4 MB, uploaded by xpatUSA on Oct. 10, 2023.

  • Members 300 posts
    Oct. 10, 2023, 12:56 p.m.

    Here's some screenshots from RT. There are many more methods and you can make your own tweaks in every method!

    Tomato_Conversions_in_RT.jpg

    Tomato_Conversions_in_RT.jpg

    JPG, 526.8 KB, uploaded by TimoK on Oct. 10, 2023.

  • Members 300 posts
    Oct. 10, 2023, 2:07 p.m.

    This is more natural in my eyes. I like smooth gradation. It's like documentary photograph in B&W film. In that case we used slight yellow filter with ( panchromatic) b&w film to avoid blue skies to burn out and to keep other colors in natural grey tone. You can do that effect reducing blue a little and maybe raising red and green a little. But why not to use more dramatic tones? In the first tomato conversion I imitated rad filter in film to make tomatoes almost white. In the last tomato example I used blue filter which made tomatoes too dark to my taste. I prefer channel mixer with arbitrary tweaks.

  • Members 510 posts
    Oct. 11, 2023, 6:18 p.m.

    Depending on the camera, there may be a quality JPG inside the raw file. Canon has done this for years now.

  • Removed user
    Oct. 11, 2023, 8:39 p.m.

    I like the gradation to be that of the scene. So, if the scene contains a sharp edge, I would prefer the capture to render an equally sharp edge (no overshoots/undershoots). Not possible in theory, so let's say that an edge response where 10-90% takes 1.26px is as good as it gets.

    www.falklumo.com/lumolabs/articles/sharpness/index.html

    On the other hand, if the scene has smooth gradation such as a sky, then I would not like to see banding.

    For my cameras (not Canon), the in-camera JPEGs are of a fixed quality, even when embedded in the raw file. They all have chroma sub-sampling, so are not of the best quality.

    If I am trying for maximum image quality, I start with the raw file. From there, if I need a JPEG I can set the quality and subsampling as appropriate for the image destination. Rare, but FastStone Viewer can save a JPEG as RGB with zero interpolation and zero subsampling .... the ultimate JPEG quality!

    users.wfu.edu/matthews/misc/jpg_vs_gif/JpgCompTest/JpgChromaSub.html

  • Members 300 posts
    Oct. 12, 2023, 6:40 a.m.

    In my Sony 7RIV there's 1616x1080px jpg file embedded for preview in the RAW file.
    I extracted the preview jpg from raw file. The camera was set to B&W. JPG was also b&w ( in rgb color space, but desaturated )
    RAW did open as color picture in RawTherapee.

    I don't know, but I guess there is also a small jpeg in Donald's 7m4 RAW files.

    I don't think any JPG was really editable. You can do small edits.
    If you do strong edits eg. color corrections or gamma corrections rising shadows, you decrease image quality.
    The RAW file is much better starting point.

  • Members 300 posts
    Oct. 12, 2023, 9:18 a.m.

    I agree. But the most important is that you are able to edit your picture in which way you like it.

    Thank you for mentioning that chroma subsampling in JPEGs!

    I checked my export settings in Gimp and RT. In both of them you can select very high quality settings.
    Gimp manual tells there is no chroma subsampling at 4:4:4 setting. I use quality setting 100. I guess it means zero interpolation ...
    Look: docs.gimp.org/2.10/en/gimp-images-out.html#save-export-image

    In RT I also have Quality: 100 and Subsampling: Best Quality.

    From the same picture I get the same file size in both editors with these settings.