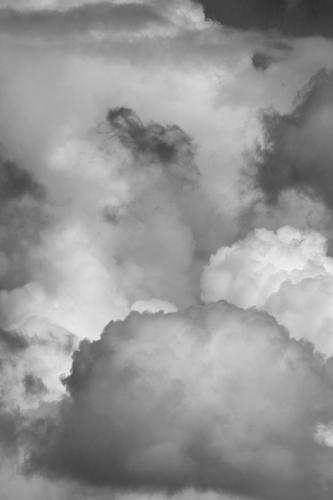
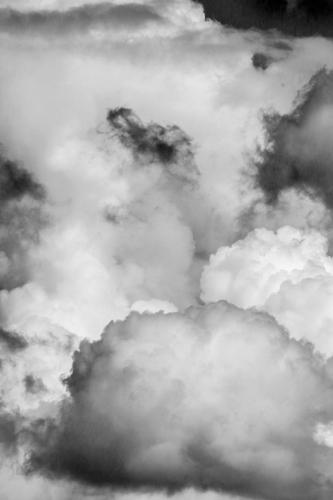
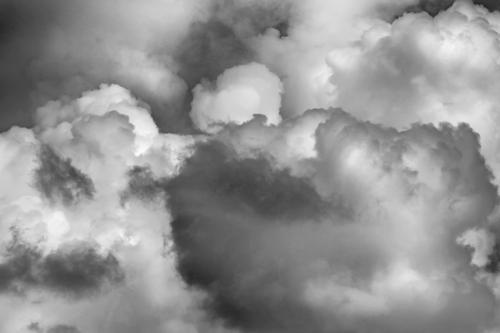
Almost exactly 100 years ago, Alfred Stieglitz began work on a series of cloud photographs he called "equivalents". I am also fascinated with clouds and have tried with minimal success to capture the power and grandeur of clouds, especially storm clouds. Processing has been an issue. First the natural graininess of clouds can be difficult to tame with post processing. Next, perhaps more contrast, dodge and burn or overall darkness would help but I have difficulty finding a balance between the dramatic and a natural appearance. Thanks for any suggestions.
April 7, 2023
12
-

-

You can add more "punch" to the images by increasing the contrast using a Levels Adjustment Layer in something like Photoshop Elements.
If we can post edited versions of your images I can show more clearly what I mean.
-
Yes, I would appreciate any examples showing improvements in processing. According to the forum rules, that is always allowed unless the OP specifically does not want to see any modifications. In that case, I am not sure why anyone would even post on this forum.
-
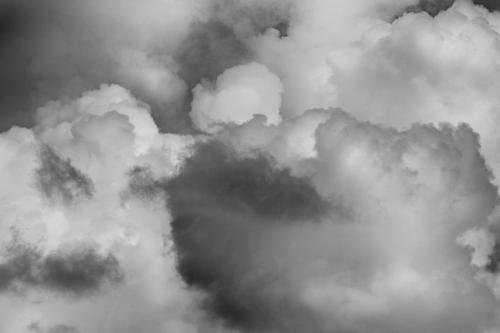
Here is my attempt to add some "punch". I would really like to see the results from someone with more skill at post processing. I rarely do much beyond simple cropping and adjustments.
-

I think a lot of what you want to do would be best done on RAW files (I'm sure there are people here who could make suggestions to improve these jpegs). The ability to recover details by manipulating the shadows and highlights could be very helpful. I don't know if you shoot RAW and if you do how you could share that type of file on the forum.
David
-

I agree with the comment that these kinds of adjustments should begin at the RAW file level. If you use Photoshop then I would suggest using luminosity masks to make adjustments to specific tonal ranges. Even better use Blend-If sliders (in Grey)for selective tonal adjustments. However these techniques should not be used on JPEG or PNG format files.
-
My typical workflow is to open raw files with Canon's DPP4 software. For those not familiar with this, it is basically a simplified version of Lightroom with the advantage of better image quality and default noise reduction that actually works well. After DPP4, I save in Tif format and perform final PP with Elements. I again save as Tif for archival storage and printing. I only convert to jpeg for online uploads.
-
I haven't seen any forum rules yet for this forum and in the old DPReview members were supposed to ask for permission to post edited versions of other members' photos.
www.dpreview.com/community-guidelines
Anyway, as others have suggested the raw file would be a much better starting point than jpegs. Maybe you could attach a raw file to a post so members can download and experiment with it.
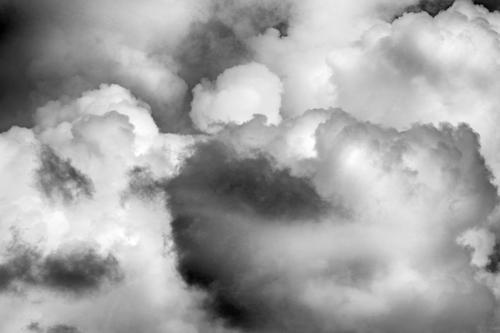
Starting with your jpeg, I opened it in Adobe Camera Raw (ACR), bumped up the exposure slider a bit and moved the blacks slider to the left in order to get the full range of tones according to the histogram. I also bumped up the clarity and contrast sliders a bit. I don't see many other options from starting
In terms of the graininess you mention, I think most of it is noise in the image. I see on the left image you used 1/4000s with ISO 400. I suspect you set a much lower exposure* than what you could have gotten away with. Unless the clouds or you were moving very fast at the time, I would think 1/1000s would have been plenty fast enough to freeze any motion at the 250mm you used.
1/1000s would have given you an extra 2 stops of exposure* thus significantly reducing visible noise in the raw data. That is something you might consider in future similar situations.
* exposure - amount of light striking the sensor per unit area while the shutter is open
** optimal exposure - the maximum exposure* within dof and motion blur requirements without clipping important highlights.
*** under exposed - more exposure* could have been added with the DOF and blur constraints still being met without clipping important highlights. -
Danno, thanks for the extensive comments.
Just one quick point. The forum rules have been posted at the top of the forum. The rules mention that posting edited versions is acceptable unless the individual posting specifically states that is not acceptable. (In which case, personally I would never respond to such a post, not knowing what the OP intended and what they would find acceptable in the way of comments.)
I found you comment on ISO/shutter speed very interesting and that was something I did not notice. I usually shoot aperture priority and my chosen default is f/11. Unless I have some special intent I have recently switched to autoISO. I am really surprised that the camera solution to the exposure was 1/4000 sec at ISO 400. I will be doing some further research on the autoISO algorithm.
That said I am not a bit concerned about shooting at ISO 400. In fact before switching to autoISO that was my default setting with my older camera. With my current camera I have no hesitation to shoot at ISO 3200 or even my max of 6400 for autoISO. Noise just is not the problem it used to be a few years ago at least with the cameras and software I have been using. Thanks for the recommendation, anyway.
You have given me a lot to think about. I will work to understand the autoISO. I will try some low ISO shots even though I except to continue to see the grain.
You have also helped me conclude that tightening up the black and white points and other steps to increase contrast are needed to emphasize the structure of the cloud formations.
-
No problem.
I didn't really mention ISO except for stating what you used. I also routinely set Auto ISO because it is the last control that I need to be set after aperture and shutter speed.
You mentioned in your op that noise/grain in the clouds can be difficult to tame. The point I was making by suggesting a slower shutter speed is that to maximise the quality of the raw data, at least in terms of minimising visible noise, you need to get as much light as possible onto the sensor while the shutter is open within your DOF and motion blur requirements and without clipping important highlights.
-
You have already got some great feedback and very instructive comments from Danno and I concur with all that he has told you. I'll try not to re-tread that ground except for emphasis.
Even though you have a camera that manages higher ISO well for you, I would still suggest using the lowest possible ISO you can until you get raw base files that suit you and hold up to the processing you want. That way you can eliminate the higher ISO as a potential trigger for the "noise" that is bothering you. I would also use the old fashioned approach of ETTR - expose to the right as far as possible without blowing any highlights - while you experiment with capture. If the "noise" is still present with the lowest possible ISO, then ISO may not be a factor. The best cloud photographer I know uses this approach with a wide array of camera bodies. And yes, you are wise to explore what your camera's brain decides about ISO adjustment when it's set to auto. I'm sure there are controls that will let you limit its choices. My personal preference with clouds, or other massive amounts of water vapor such as fog or big powerful waterfalls is to shoot with full manual control including ISO. All water vapor is comprised of droplets which may look like noise in the capture but may not really be noise of the kind we are used to, and don't respond well to noise removal software. To get a look you want, you may have to rely on software solutions that let you add some blur in a masked layer or negative clarity with a brush to smooth things out where you want it smooth.
If I'm using noise reduction I use it before other raw adjustments. When adding clarity/contrast, new versions of ACR (/Lightroom) offer a lot of help for isolating various areas and treating them individually so that adjustments are not applied universally. That becomes important with different areas of brights/darks like your clouds. There's also various tools in PS, but I'm not sure they are all there in Elements.
Someone mentioned Silver Efex. It is my favorite too for black and white conversions of highly structured clouds like in your captures.
This is a fascinating project, capturing the art that lives in the sky.
-
Thanks for the help comments. Regarding ISO, thankfully my days of trying to shoot as low as possible and shooting to the right are nuisances of the past. I did a lot of studies when I got my camera. Between improved sensors and improved software the previous issues with noise are of minimal concern. I am only concerned on those few cases where I want to pull details out of very dark shadows. I have no idea what you are shooting but, if it is a camera more than a few years old, it is worth considering an upgrade.
I believe you are correct about the "noise" issue with clouds. I checked some other images shot at low ISO and they look no better. I think the noise is due to the nature of the clouds themselves. It probably did not help that the images I posted were at 250mm APS-C, equivalent to 375 mm full frame.
I have also tried your suggestion on using software to blur the grain. A gaussian blur with a radius in the range of 1.5-3 works well for me. Even without that, the noise/grain pretty much disappears when the images are printed.
Again, thanks. Lots of good ideas to consider.
-
To be honest I can't claim to know a single thing, when it comes to capturing clouds effectively, so my opinion is probably of very limited value in this matter, but solely speaking from a person who has done quite a bit of retouching, what "minniev" mentioned might be key, when it comes to post processing clouds. If you can apply certain corrections to parts of the image you can get a lot more out of it, without affecting others negatively. I'm pretty sure every version of Photoshop or similar software can do this (even if it might not be the RAW-processing tools). You can do most of that with sharpening, curves, selective color etc.
If you're not completely opposed to the idea, I would also recommend using LUTs (look-up-tables): From my experience they can be a great help in finding the 'right path' in terms of post processing, even if you ultimately use different tools to get there.
It all depends on how much time you want to spend with all of that, but once you found a good solution you may be able to use it for a lot of similar images in the future. Here's my quick version (I tried not to overdo it in order to not create too much problems with noice etc, so it's mostly nuanced adjustments):
No idea if that's even in the direction you wanted to go though...