• Members 15 posts
    April 22, 2023, 2:41 p.m.

    Hi all,

    a few years ago I used an Epson V500 for digitising my negatives, but found the process rather tedious and resolution unsatisfactory with 135 film.
    I've recently revived my at-home film processing and digitising, for the first time using my mirrorless camera for digitising.
    I'm using a lightbox and film holder in conjunction with a tripod and macro lens, with a remote shutter release and 2s delay.

    Since I'm new to this process, I am still exploring my workflow parameters.
    In your experience, what is the best approach for manually selecting exposure for digitising B&W negatives?

    Do you use a balanced exposure, with most brightness values in the centre of the histogram?
    Or do you use ETTR (expose to the right) for maximum shadow details (highlight details after inversion)?

    And do you adjust exposure shot-by-shot?
    Or do you keep a set exposure for some/all frames, so long as consecutive frames have reasonably consistent exposure?

    Thanks for sharing your experience!
  • Members 280 posts
    April 22, 2023, 3:58 p.m.

    I used evaluative metering for my B&W negs. According to the manual, the camera divides the image into 256 sections and thinks about it.
    The images then need a bit of final adjustment, but they are close to what I want.

    Don

  • Members 1737 posts
    April 22, 2023, 4:08 p.m.

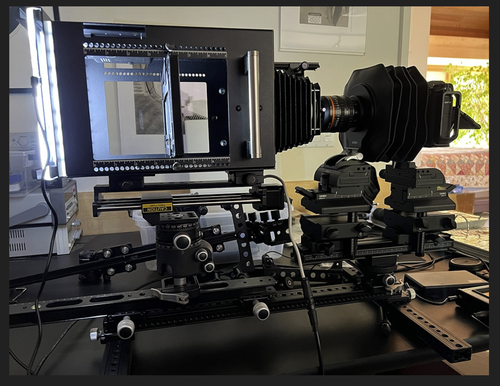
    I digitize negs with a GFX 100S. I use ETTR. I adjust exposure for each neg. I use a magenta (minus green) Rosco filter for B&W negs.

    blog.kasson.com/?s=scanner

    frankenscanner.png

    frankenscanner.png

    PNG, 2.7 MB, uploaded by JimKasson on April 22, 2023.

  • Members 621 posts
    April 22, 2023, 4:40 p.m.

    Like Don mentioned, evaluative metering is pretty good at getting most of the way there. I sometimes adjust 1/3 to 2/3 stop either way, but slight differences are really a non issue. The V500 at best is around 1700 to 1800 ppi…giving you around 5mp tops. You really need between 3200 and 4000 ppi to pull the most off of fine grain films. Specialty films benefit up to 24mp. For most stuff though, if you get between 10mp and 12mp, that is sufficient…so around 2900 ppi on scan.

  • Members 15 posts
    April 22, 2023, 4:58 p.m.
  • Members 15 posts
    April 22, 2023, 5:02 p.m.

    Like in-camera, it likely depends on the subject and if it's meant to have a lighter or darker exposure, but you're likely right that evaluative metering should get close.

    Maybe I'll do a few comparisons. ETTR should potentially yield more information in the file. But exposure adjustment for each frame in post can add up when processing a big lump of files. Swings and roundabouts.

    Oh, I have no illusions about the effective resolution I'll get out of my old V500. I considered a higher density scanner, but didn't fancy the workflow. Hence my experimentation with camera digitising.

  • Members 15 posts
    April 22, 2023, 5:08 p.m.

    Impressive rig, Jim! Appreciate the thorough documentation. My pedestrian setup pales in comparison. Not that I'd have the accuracy nor resolution requirements that you seem to make good use of.

    PS: I recognize your post on format size and image quality from 2019, which continues to be a great write-up.

  • Members 58 posts
    April 22, 2023, 6:03 p.m.

    I think this software allows threads to be sticky, so hopefully this thread can be pinned to the top

  • Members 15 posts
    April 22, 2023, 7:28 p.m.

    Or - if possible - threads can be merged.

  • Members 39 posts
    April 23, 2023, 10:21 a.m.

    Letting the camera work out exposure works so long as you don't have too much backlight in view - I'm happy for that to clip, but the camera disagrees. For some formats (specifically 35mm sprocket exposures) it's hard to avoid exposed backlight.

    Adjusting exposure per shot is more useful when the film was shot with manual exposure settings, as there's more variation in negative density (I am a worse light meter than even early metered cameras). You can safely set an ETTR exposure by getting unexposed film just shy of clipping - that's the most transparent any part of an image will be, and the unexposed film shouldn't vary too much along the roll. There might be a little more headroom available on a frame that was highly exposed, but you won't lose anything on a less exposed frame.

  • Members 1737 posts
    April 23, 2023, 2:14 p.m.

    If you don't mask out the places where there's no film to be scanned, you're going to have lens flare issues.

  • Members 39 posts
    April 23, 2023, 8:53 p.m.

    I haven't had too much trouble, and like I said - if the image extends to the edge of 135, bare backlight is unavoidable. Both in the sprocket holes, and around the edge of the film. For sprocket exposures, IMO they work best when you include the very edge of the film so you need a little clearance

  • Members 1737 posts
    April 23, 2023, 11:18 p.m.

    So you're trying to digitize information outside of the 24x36mm 135 image area? I've never thought I wanted to do that.

  • Members 2 posts
    April 26, 2023, 7:23 p.m.

    I get sufficiently consistent results by leaving exposure for each frame to my camera and its multi patch exposure logic (Sony A7R3). I found that for masked colour negative film I had to add mostly about +2/3 to exposure across all frames. I would measure one balanced frame and check the histogram to decide on this shift. I do not place the exposure completely to the right, but closer than the default measurement would indicate, leaving a bit of room on the right to make sure the bright patches do not get overexposed. I leave this shift the same for all frames of a particular film. When uncertain, I check the histogram for all channels to make sure.
    Alfred