• Members 1597 posts
    April 2, 2023, 7:36 p.m.

    OK. I couldn't get your program to work. I'm using Windows 7 on this computer (maybe that's the reason). I have other computers with Windows 10. I make these computers last forever. :-)

    OK I was able to write the code to take the EXIF data in MS Word and put down the six lines down together in one place. Here it is.

    Sub EXIFData()
    Dim A As Integer
    Dim vardata
    vardata = Array(3, 13, 14, 16, 27, 47)
    For A = 0 To 5
    ActiveDocument.Paragraphs(vardata(A)).Range.Copy
    Set myRange = ActiveDocument.Range _ (Start:=ActiveDocument.Content.End - 1, _ End:=ActiveDocument.Content.End - 1)
    myRange.Paste
    Next A
    End Sub

    I edited the above programming code on 4-3-23 to correct an error. It did not fail because I spelled "vardata", "verdata". It was off by one letter...sorry about that.

    I used some of the code from others since I am not familiar with the syntax. But then I looped it through the array. By putting it together with someone else's code and my code it worked. I'm sure there's many other ways to do it. I'm a newbie with MS Word VBA. :-)

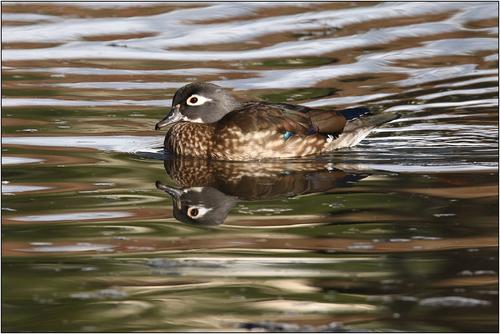
    The result is (using my heron picture):

    Model - Canon EOS 800D
    ExposureTime - 1/640 seconds
    FNumber - 8
    ISOSpeedRatings - 4000
    FocalLength - 600 mm
    Lens Model - TAMRON SP 150-600mm F/5-6.3 Di VC USD A011

    I'm using the "Europe" model 800D because I bought it that way from Ebay for a good price. For the North American market (and maybe others) the model would be the Canon T7i.

    If you want to use what I wrote in MS Word and test it out, please let me know if you have any questions. Maybe it could be enhanced. I only spent about 30 minutes developing the code.
    .

  • Members 1597 posts
    April 2, 2023, 10:15 p.m.

    It's been raining so I had time to play around with this code. With this new version I can copy & paste multiple sets of EXIF data from each image into the MS Word Document. I can run the program and it will give me the EXIF for each image. This way, I only have to do it once. For example if I had five sets of EXIF data for each image, I would change TheEnd to 4.

    OK, here's the code for any of you. Feel free to modify. It's probably been about 20 years since I wrote any MS Word VBA code (and very little of it), so I was happy I got this far. As always, code is work in progress.

    For those that don't know, I wrote this for my IrfanView software, to be able to quickly copy & paste the selected EXIF data for each image that is posted. It was just a method that I found that worked. I'm sure there's many other ways. It was just an idea that I can use until something better comes along. If you find any errors, please let me know and I'll correct it.

    Sub EXIFDataMultiple()

    Dim A As Integer: Dim B As Integer: Dim TheEnd As Integer: Dim EXIFLen As Integer: Dim vardata

    '*******************
    '
    This code is written for multiple EXIF data sets for each image. * ' TheEnd is any additional image EXIF data set beyond the first one. * ' For example, when TheEnd is two, this is for three sets of image EXIF data. * ' EXIFLen is the fixed number of EXIF data lines plus one; that is 103 + 1 (allowing for one space). * ' Any subsequent EXIF data must be inserted in the MS Word document with one separating space to match the code. * '
    ********************

    TheEnd = 2
    EXIFLen = 104

    For A = 0 To TheEnd

    For B = 0 To 6
    vardata = Array(1 + EXIFLen * A, 3 + EXIFLen * A, 13 + EXIFLen * A, 14 + EXIFLen * A, 16 + EXIFLen * A, 27 + EXIFLen * A, 47 + EXIFLen * A)
    ActiveDocument.Paragraphs(vardata(B)).Range.Copy
    Set myRange = ActiveDocument.Range(Start:=ActiveDocument.Content.End - 1, End:=ActiveDocument.Content.End - 1)
    myRange.Paste
    Next B

    Next A

    End Sub

    So with my test case, using three sets of EXIF data (that are all the same) this is the result: I decided to add the filename in each case. I'm not sure how to add a blank line.

    Filename - ResizedFH24..jpg
    Model - Canon EOS 800D
    ExposureTime - 1/640 seconds
    FNumber - 8
    ISOSpeedRatings - 4000
    FocalLength - 600 mm
    Lens Model - TAMRON SP 150-600mm F/5-6.3 Di VC USD A011
    Filename - ResizedFH24..jpg
    Model - Canon EOS 800D
    ExposureTime - 1/640 seconds
    FNumber - 8
    ISOSpeedRatings - 4000
    FocalLength - 600 mm
    Lens Model - TAMRON SP 150-600mm F/5-6.3 Di VC USD A011
    Filename - ResizedFH24..jpg
    Model - Canon EOS 800D
    ExposureTime - 1/640 seconds
    FNumber - 8
    ISOSpeedRatings - 4000
    FocalLength - 600 mm
    Lens Model - TAMRON SP 150-600mm F/5-6.3 Di VC USD A011

    Note: I added any extra period between 24 and jpg, so that it doesn't show up as blue text etc.

  • Members 1597 posts
    April 2, 2023, 11:05 p.m.

    OK, I'm going to try and insert three images and see if my EXIF program works. I accidentally had in one extra space. That was frustrating. It's my weak code with no error protection. :-) But I fixed it.

    Photo No. 1
    ResizedApril-2022-3.jpg

    Model - Canon EOS Rebel T7i
    ExposureTime - 1/200 seconds
    FNumber - 9
    ISOSpeedRatings - 1000
    FocalLength - 22 mm
    Lens Model - EF-S18-135mm f/3.5-5.6 IS USM

    Photo No. 2
    ResizedApril-2022-2.jpg

    Model - Canon EOS Rebel T7i
    ExposureTime - 1/640 seconds
    FNumber - 9
    ISOSpeedRatings - 800
    FocalLength - 35 mm
    Lens Model - EF-S18-135mm f/3.5-5.6 IS USM

    Photo No. 3
    ResizedApril-2022-1.jpg

    Model - Canon EOS Rebel T7i
    ExposureTime - 1/640 seconds
    FNumber - 9
    ISOSpeedRatings - 800
    FocalLength - 18 mm
    Lens Model - EF-S18-135mm f/3.5-5.6 IS USM

    It appears successful. Should I have the EXIF data on top or the bottom of each image? I like it with the EXIF data on the bottom when I labeled the photo on top like Photo No. 1, Photo No. 2 etc.

    ResizedApril-2022-3.jpg

    JPG, 316.7 KB, uploaded by Digirame on April 2, 2023.

    ResizedApril-2022-2.jpg

    JPG, 332.7 KB, uploaded by Digirame on April 2, 2023.

    ResizedApril-2022-1.jpg

    JPG, 372.9 KB, uploaded by Digirame on April 2, 2023.

  • Members 1597 posts
    April 2, 2023, 11:41 p.m.

    OK, this is another test with the EXIF program I wrote using MS Word VBA code. I'm pushing the envelope with five resized images.

    Photo No. 1
    ResizedDC20.jpg
    Model - Canon EOS 800D
    ExposureTime - 1/500 seconds
    FNumber - 9
    ISOSpeedRatings - 400
    FocalLength - 600 mm
    Lens Model - TAMRON SP 150-600mm F/5-6.3 Di VC USD A011

    Photo No. 2
    ResizedDC23.jpg
    Model - Canon EOS 800D
    ExposureTime - 1/500 seconds
    FNumber - 9
    ISOSpeedRatings - 250
    FocalLength - 600 mm
    Lens Model - TAMRON SP 150-600mm F/5-6.3 Di VC USD A011

    Photo No. 3
    ResizedDC24.jpg
    Model - Canon EOS 800D
    ExposureTime - 1/500 seconds
    FNumber - 9
    ISOSpeedRatings - 250
    FocalLength - 600 mm
    Lens Model - TAMRON SP 150-600mm F/5-6.3 Di VC USD A011

    Photo No. 4
    ResizedDC25.jpg
    Model - Canon EOS 800D
    ExposureTime - 1/500 seconds
    FNumber - 9
    ISOSpeedRatings - 320
    FocalLength - 600 mm
    Lens Model - TAMRON SP 150-600mm F/5-6.3 Di VC USD A011

    Photo No. 5
    ResizedDC28.jpg
    Model - Canon EOS 800D
    ExposureTime - 1/640 seconds
    FNumber - 9
    ISOSpeedRatings - 500
    FocalLength - 600 mm
    Lens Model - TAMRON SP 150-600mm F/5-6.3 Di VC USD A011

    I arranged these photos in the correct order so that it made it easier. I did not have a programming glitch this time, as I made sure there wasn't an extra space at the top of my MS Word document. There were spaces inserted between each EXIF data set. I changed "TheEnd" to 4. That was it and this time it appears to have worked perfectly.

    ResizedDC28.jpg

    JPG, 178.1 KB, uploaded by Digirame on April 2, 2023.

    ResizedDC25.jpg

    JPG, 173.6 KB, uploaded by Digirame on April 2, 2023.

    ResizedDC24.jpg

    JPG, 194.6 KB, uploaded by Digirame on April 2, 2023.

    ResizedDC23.jpg

    JPG, 188.7 KB, uploaded by Digirame on April 2, 2023.

    ResizedDC20.jpg

    JPG, 182.4 KB, uploaded by Digirame on April 2, 2023.

  • Members 643 posts
    April 3, 2023, 8:34 a.m.

    Looks like a great strategy, Digirame, but anything code related is far above my head. I think I'll just manually type it in, or use mocha's program (which he kindly provided several months ago).

    On a completely unrelated note, did you change your DPR username slightly in the last few months? Or have I just been spelling it wrong the whole time?

  • Members 1597 posts
    April 3, 2023, 12:49 p.m.

    Hi Dunlin,

    Digirame is the same as it's been for years. If you want to use the more simple code for one set of EXIF data (from IrfanView) use this:

    Sub EXIFData()
    Dim A As Integer
    Dim vardata
    vardata = Array(1, 3, 13, 14, 16, 27, 47)
    For A = 0 To 6
    ActiveDocument.Paragraphs(vardata(A)).Range.Copy
    Set myRange = ActiveDocument.Range _ (Start:=ActiveDocument.Content.End - 1, _ End:=ActiveDocument.Content.End - 1)
    myRange.Paste
    Next A
    End Sub

    I added the filename (the number 1) and corrected an error. I'll walk you or anyone through it if you want...just let me know. With code, it's often best to start with something simple and then after that try something more complicated. I'm going to edit my above message to correct that programming error. It did not fail because I spelled "vardata", "verdata". All it takes sometimes is one letter or even a blank space to mess up code.

  • Members 411 posts
    April 3, 2023, 1:52 p.m.

    They're all looking good to me Digirame, Your code sure does the job.

  • Members 1597 posts
    April 3, 2023, 2:28 p.m.

    Thanks. It's a workaround until this site develops something similar to what was provided on Dpreview. It's my understanding that they are working on that.

  • Members 643 posts
    April 3, 2023, 5:30 p.m.

    Oh, so just me. Sorry.
    Yes please, a walkthrough would be great.

  • Members 1597 posts
    April 3, 2023, 5:50 p.m.

    OK for the walkthrough....

    1) Download the free IrfanView software if you don't already have a copy.
    2) Use the software for a few sample images...resize if you would want.
    3) In IrfanView check out the EXIF data under Image, then Information.
    4) See the button to copy to the clipboard and push it.
    5) Open up a blank MS Word document, put the mouse cursor at the top of that document and push Ctrl+V to paste it in from the clipboard.
    6) In MS Word, push Alt+F11. That will bring you to the programming modules.
    7) Copy the program I wrote (start with the simple one) into a module.
    8) Run the program, by putting the mouse cursor any where in the code section and push the arrow in the ribbon above between the words "Run" or "Debug". Or push the F5 key.
    9) Copy & paste the selected EXIF data at the bottom of the MS Word document into your DPRevived post, next to your image.

    Now your version of IrfanView might be different than mine, so consider my instructions only for testing. Then we can fine tune it to match what you have. I wrote this from memory...hope I didn't mess up...but if I did I'll edit it and we'll go from there. At any of the steps I wrote, if you get stuck, let me know. Then I'll open up IrfanView or MS Word and look at more details and we'll get it to work.

    After this test is complete, you may want to select different EXIF data lines. That will be super easy. All we do is have to put that number in the array and loop it all the way through. I'll explain further later if you need that help. Again, that will be super easy. Let's just get this test to work first. :-)

  • Members 1597 posts
    April 3, 2023, 8:33 p.m.

    Just to let you know...I found that when I pasted the EXIF data from the clipboard into MS Excel, it was placed into each individual cell down one column. I hadn't explored that option until now. Writing code for that would be easy for me. I just wasn't as familiar with the MS Word VBA syntax, but got it to work. Maybe I'll play around with that too.

  • Members 1597 posts
    April 4, 2023, 1:16 a.m.

    OK, this is a test of posting 12 resized images, to see if it can work fast for the EXIF data with my new program. A little over a week ago, I was walking through a park and saw a lot of things. There were some people, new green leaves, remnants of flooding and rain. Fortunately the rain did not last long.

    I edited this to put a space between the photo entries to see if that looks better. It did go fast. There were no computer programming errors. I followed a logical path with copying & pasting without any issues.

    Photo No. 1
    ResizedRBP7.jpg
    Model - Canon EOS Rebel T7i
    ExposureTime - 1/320 seconds
    FNumber - 8
    ISOSpeedRatings - 1600
    FocalLength - 24 mm
    Lens Model - EF-S18-135mm f/3.5-5.6 IS USM

    Photo No. 2
    ResizedRBP8.jpg
    Model - Canon EOS Rebel T7i
    ExposureTime - 1/320 seconds
    FNumber - 8
    ISOSpeedRatings - 2000
    FocalLength - 24 mm
    Lens Model - EF-S18-135mm f/3.5-5.6 IS USM

    Photo No. 3
    ResizedRBP9.jpg
    Model - Canon EOS Rebel T7i
    ExposureTime - 1/250 seconds
    FNumber - 8
    ISOSpeedRatings - 2000
    FocalLength - 24 mm
    Lens Model - EF-S18-135mm f/3.5-5.6 IS USM

    Photo No. 4
    ResizedRBP10.jpg
    Model - Canon EOS Rebel T7i
    ExposureTime - 1/250 seconds
    FNumber - 8
    ISOSpeedRatings - 2000
    FocalLength - 24 mm
    Lens Model - EF-S18-135mm f/3.5-5.6 IS USM

    Photo No. 5
    ResizedRBP11.jpg
    Model - Canon EOS Rebel T7i
    ExposureTime - 1/250 seconds
    FNumber - 8
    ISOSpeedRatings - 2000
    FocalLength - 29 mm
    Lens Model - EF-S18-135mm f/3.5-5.6 IS USM

    Photo No. 6
    ResizedRBP12.jpg
    Model - Canon EOS Rebel T7i
    ExposureTime - 1/250 seconds
    FNumber - 8
    ISOSpeedRatings - 5000
    FocalLength - 29 mm
    Lens Model - EF-S18-135mm f/3.5-5.6 IS USM

    Photo No. 7
    ResizedRBP13.jpg
    Model - Canon EOS Rebel T7i
    ExposureTime - 1/80 seconds
    FNumber - 8
    ISOSpeedRatings - 1250
    FocalLength - 29 mm
    Lens Model - EF-S18-135mm f/3.5-5.6 IS USM

    Photo No. 8
    ResizedRBP15.jpg
    Model - Canon EOS Rebel T7i
    ExposureTime - 1/200 seconds
    FNumber - 8
    ISOSpeedRatings - 1250
    FocalLength - 29 mm
    Lens Model - EF-S18-135mm f/3.5-5.6 IS USM

    Photo No. 9
    ResizedRBP16.jpg
    Model - Canon EOS Rebel T7i
    ExposureTime - 1/200 seconds
    FNumber - 8
    ISOSpeedRatings - 2000
    FocalLength - 29 mm
    Lens Model - EF-S18-135mm f/3.5-5.6 IS USM

    Photo No. 10
    ResizedRBP19.jpg
    Model - Canon EOS Rebel T7i
    ExposureTime - 1/250 seconds
    FNumber - 7.10
    ISOSpeedRatings - 800
    FocalLength - 35 mm
    Lens Model - EF-S18-135mm f/3.5-5.6 IS USM

    Photo No. 11
    ResizedRBP21.jpg
    Model - Canon EOS Rebel T7i
    ExposureTime - 1/250 seconds
    FNumber - 7.10
    ISOSpeedRatings - 640
    FocalLength - 35 mm
    Lens Model - EF-S18-135mm f/3.5-5.6 IS USM

    Photo No. 12
    ResizedRBP22.jpg
    Model - Canon EOS Rebel T7i
    ExposureTime - 1/250 seconds
    FNumber - 7.10
    ISOSpeedRatings - 800
    FocalLength - 35 mm
    Lens Model - EF-S18-135mm f/3.5-5.6 IS USM

    ResizedRBP16.jpg

    JPG, 469.2 KB, uploaded by Digirame on April 4, 2023.

    ResizedRBP21.jpg

    JPG, 429.4 KB, uploaded by Digirame on April 4, 2023.

    ResizedRBP22.jpg

    JPG, 430.5 KB, uploaded by Digirame on April 4, 2023.

    ResizedRBP19.jpg

    JPG, 440.9 KB, uploaded by Digirame on April 4, 2023.

    ResizedRBP15.jpg

    JPG, 344.8 KB, uploaded by Digirame on April 4, 2023.

    ResizedRBP13.jpg

    JPG, 480.2 KB, uploaded by Digirame on April 4, 2023.

    ResizedRBP12.jpg

    JPG, 437.5 KB, uploaded by Digirame on April 4, 2023.

    ResizedRBP11.jpg

    JPG, 446.3 KB, uploaded by Digirame on April 4, 2023.

    ResizedRBP10.jpg

    JPG, 457.2 KB, uploaded by Digirame on April 4, 2023.

    ResizedRBP9.jpg

    JPG, 376.8 KB, uploaded by Digirame on April 4, 2023.

    ResizedRBP8.jpg

    JPG, 401.0 KB, uploaded by Digirame on April 4, 2023.

    ResizedRBP7.jpg

    JPG, 391.8 KB, uploaded by Digirame on April 4, 2023.

  • Members 643 posts
    April 5, 2023, 8:28 a.m.

    Just to let you know, Digirame, I'm not ignoring your helpful instructions.
    I don't have admin access to the PC I use... hopefully I'll get IrfanView installed today.

  • Members 411 posts
    April 5, 2023, 12:26 p.m.

    I'm not sure if everyone knows but if you click on a photo in the thread it opens it up in a viewing page. I've only just found this out. :-)

  • Members 1597 posts
    April 5, 2023, 3:01 p.m.

    Cool...that would be neat to see if you could get it to work with IrfanView.

  • Members 1597 posts
    April 5, 2023, 3:04 p.m.

    Mocha,

    Yes, if you click on the embedded image, it will show up larger (if it is larger) on a separate viewing page.

  • Members 411 posts
    April 5, 2023, 4:58 p.m.

    Hi Digirame,

    I suppose It's like the Gallery on DPReview only that showed all the pictures in that set and this one shows you that one specific picture you clicked on, Still with the dark backgound it looks good.

  • Members 1597 posts
    April 5, 2023, 6:04 p.m.

    Mocha,

    I had a question now that we got you here. How did you change your red icon to Mocha 123?