ProCap …. The Trade Offs ..
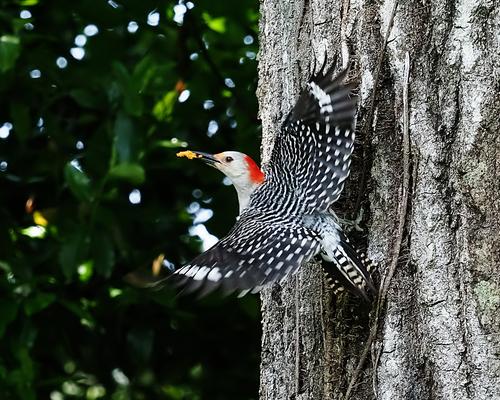
Still working and reading about ProCapture and the more I work with it the more I begin to think its all about trade offs and just being persistent and lucky … Here is our Red Breasted Woodpecker
Not really in sharp focus .. taken with the M1.2 and the 40-150mm lens with the MC-14. The picture was taken at 140mm and f/7.1 to get more DOF and allow him to stay in the frame longer. The first trade off would be to use a longer focal length and fill the frame more … The ISO was 6400 at a shutter speed of 1/1250 ...the trade off being a wider aperture to lower the ISO and retain a bit more detail and need a less aggressive NR process … One could also lower the SS. Wider aperture means less DOF and lower shutter speed means more motion blur as even at 1/1250 we have not completely reduced the motion blur of the wings …. with smaller birds we may not even stop the body motion blur by this point in the take off … And as to gaining DOF by reducing the focal length I probably will want the same composition regardless of the focal length used and that loses me the DOF that I got by using the shorter focal length and I've also made the noise reduction a bit harder by cropping … Also one needs to consider that the time of day (light) and position relative to the bird are major factors. .. Many factors to weigh and maybe just take your choice, put in the time needed and hope you're lucky! ….
Another factor with ProCapture that I run into is the problem presented by the thousands of RAW files that are acquired to be evaluated and a few to be processed. .. and many are processed simply to evaluate the trade offs!!! … With this many files I want to reduce the number of steps as much as possible.. For the above picture I used Neat Image to do noise reduction and maybe recover some detail .. and if I find a satisfactory setting for this set I can batch process them reducing PP time considerably .. ( I know there are perhaps better AI alternatives but I don't have a graphics card in my current computer so they become a bit tedious. Also tests with early versions were not satisfying for me … The AI programs also like to do the RAW to TIFF [or to a JPEG finished version] conversion and I have found in other tests that I prefer OV3 to do that.)
For the picture above I used Neat Image and minimal processes in Affinity to PP
it from a TIFF to JPEG. The picture below was selectively processed to reduce noise from the OV3 TIFF. Additional procedures were used in Affinity to produce the final JPEG ..
Without a detailed examination I see little differences and probably not enough to warrant the additional time for the posted version. …. but then maybe you do or would like an even a better prepared picture for posting here … ( another problem, of course, is that I reduce these pictures to about 1MB for posting, so you never see the full file version. )
I would like to read any thoughts you might have about the pictures and/or the process ….
WhyNot

