While I've been active as a photographer since the 1990s, it's only been in the last five years that I've come to have a deeper appreciation of what the in-camera meter does and how it can be a useful reference in the photography I do. I'd like to share that with you. I'm making this post in the Photography and Technique forum because the topic isn't what i consider, "need to know" information for the beginner. Rather, it's a niche topic that will hopefully be of some interest to more experienced photographers.
For the purposes of this post, I'm going to set aside a discussion of the metering modes and focus just on what information the meter is displaying and how to put that to use.
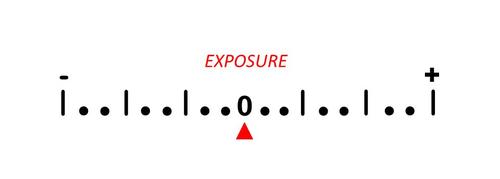
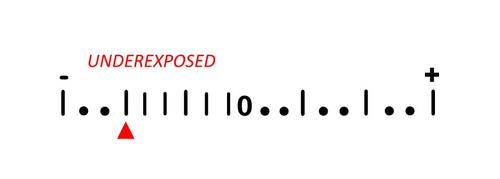
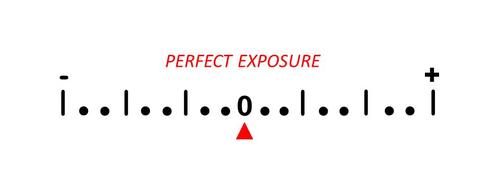
When I first started doing photography, I came to think of the in-camera meter as an "exposure" meter. I equated exposure with image lightness and thought of the meter as incating how light a photo will look. The meter was also a target. The goal was for the meter to display a reading of 0 because that indicated a "perfect exposure"...perfect lightness. Any reading above 0 indicated overexposure and a reading below 0 indicated underexposure.

For decades, this is what I understood the in-camera meter to be and what it was telling me. I never really gave it much thought and had no idea I was misunderstanding this useful tool.
In 2018, I added a Nikon D500 to my camera collection. I bought it because bird and wildlife photography had become my primary interest and I wanted a camera with much better autofocus, a higher burst rate, and deeper buffer than the Nikon D610 I had been using. I had been test-driving manual exposure mode for a few months with the D610 and, when the D500 arrived, I put that camera in manual as the default setting.
To be clear, I'm not recommending that all photographers shoot in manual exposure mode. We're fortunate to have multiple exposure modes available in just about every modern digital camera. Regardless of the workflow that is the best fit for your interests and needs, there's probably an exposure mode that suits you, to a tee. I bring up my transition to shooting in manual mode because it had an unexpected but profound impact on how I understand and use the in-camera meter.
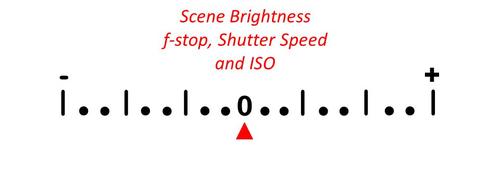
The meter takes multiple sources of information into account in arriving at a reading. These include scene brightness (available light), f-stop, shutter speed and ISO. The fact that the meter takes ISO into account means that it is not strictly an exposure meter. If all it measured was exposure (scene brightness per unit area as projected by the lens upon the sensor), then ISO would not be a factor. But it is.
If the meter only measured exposure, I suspect it would be less useful as a tool for the photography I do. By taking ISO into consideration, the in-camera meter predicts the lightness of the photo about to be made. I find this useful. It helps me confirm the exposure settings and ISO I've chosen will deliver a pleasing image.
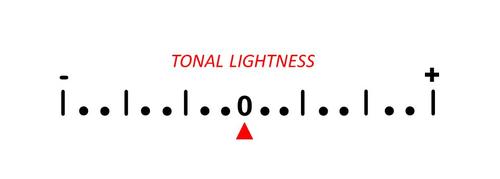
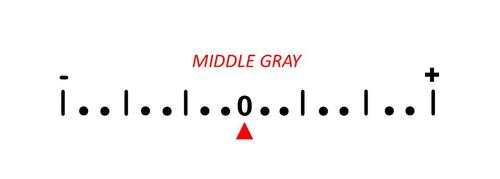
Another way of putting this is to think of the in-camera meter as predicting a photo's tonal lightness. Tonal lightness is a measure of the lightness of a scene from black to white. Black and white set the end points. Gray has a tonality between those extremes. Broadly speaking, a meter reading of 0 indicates the photo will have an overall lightness matching that of middle gray or 18% gray. A camera in auto exposure mode, aperture priority, shutter priority, program, or manual plus auto ISO will choose settings to produce a meter reading of 0. In other words, the camera is designed to make the world look middle gray.
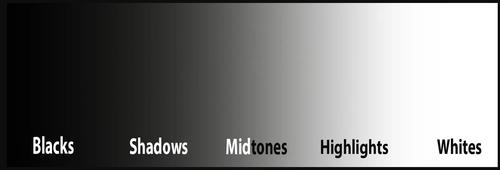
[A range of tonal lightness from black to white]
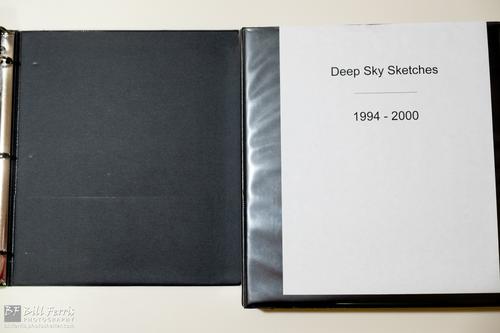
You can test and see this pretty easily for yourself. Put your camera in full auto mode and fill the frame with a black surface. Make a photo. Without changing any settings, fill the frame with a white surface. Make a photo. Let's have a look at some common results. The next three photos were made with a Fuji X-T20 mirrorless camera in full auto mode. The first photo is of a white sheet of paper in a binder. The second photo is of the black binder cover. The third photo shows the open binder cover and the sheet of paper.
[Photo of a white sheet of paper made with a Fuji X-T20 in auto mode]

[Photo of a black binder cover made with a Fuji X-T20 in auto mode]
This is how cameras are designed to render the world. This isn't a problem, per se. Let's be honest, how often do you photograph black binder covers and white sheets of paper? In many cases, the scenes we photograph include a range of tonalities. If the average tonality of the photo matches 18% gray in lightness, it will probably look pretty good.
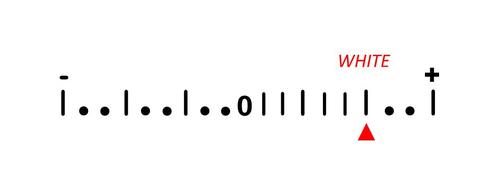
A meter reading of about +2 stops from 0 indicates a predicted lightness matching that of white. For instance, if you were to photograph a snow-covered field in manual mode, a meter reading of +2 would accurately represent the lightness of that wintry scene.
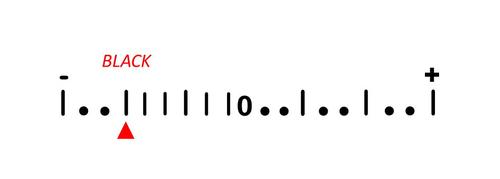
A meter reading of about -2 stops from 0 indicates a predicted lightness matching that of black. If making a night sky photo from a remote location in manual mode, the in-camera meter will probably read well below 0. That's OK. A pristine night sky is pretty dark.
So, how is this useful? Well, if you use your camera in manual exposure mode, it's important to recognize that a meter reading of 0 is not the goal. The goal is a meter reading matching the lightness of whatever is being metered. To illustrate, the places where I go to photograph birds and wildlife are often fields and meadows covered with straw-hued grasses. When I fill the frame with this grass, a meter reading of +2/3 stop from 0 indicates my chosen settings will produce a photo having a pleasing lightness. The photo will accurately represent the lightness of the scene; not just the grass but everything in the scene.
[Photo of a northern harrier hunting the tall grass along the east rim overlooking Mormon Lake, Arizona]

Notice the appearance of the grass, bird and sky in the above photo. All have a natural lightness. Once, I've chosen settings that render the grass with a good lightness, the sky, a bird...anything that might be in the frame when I press the shutter release will also have a tonality that looks natural.
If I were metering off a much brighter or darker reference, I would target a different meter reading. For instance, if I'm out in the winter and my grassy field is covered in snow, the same settings that produce a reading of +2/3 stop off the summer grass will produce a reading of +2 stops off the winter snow. If I'm metering off a relatively dark Ponderosa Pine forest, a reading of -2/3 stop from 0 is closer to what the meter will indicate at the same f-stop, shutter speed, and ISO that produces a +2/3 stop reading on the grass.
Suppose you prefer to work in aperture priority, shutter priority, or another mode delegating at least one key setting to the camera. Knowing that the camera will choose settings to produce an in-camera meter reading of 0 and having a sense of the tonality of the scene being metered will empower you to dial in an exposure compensation setting that will produce a photograph having a pleasing lightness.
If you're photographing a wintry scene and snow fills much of the frame, dial in between +1 and +2 stops of exposure compensation (EC) to force the camera to render the scene as it looks to your eye. Left to its own devices, the camera will make that white, snowy scene look middle gray on tonal lightness. Dialing in a positive EC setting will force the camera to give the scene a more natural appearance.
If you were photographing a northern harrier hunting in the tall grass, an EC setting of +2/3 stop would force the camera to render the scene with a lightness that looks more natural. If you're photographing a bride in a white wedding dress, dialing in a positive EC will give the dress a more natural appearance. You might choose (for creative reasons) to stay closer to +1 stop than +2 stops. The higher setting may render the dress so bright that fine details in the stitching are lost. These are the internal conversations a photographer has when seeking a balance between capturing the scene as it looks to the eye and preserving details in the brightest and darkest areas of a composition.
If there's one thing I hope you take away from this post, it's that the notion of a meter reading of 0 representing perfect exposure is not always reliable. A meter reading of 0 indicates the overall tonal lightness of the scene will match middle gray or 18% gray. While there are many situations in which that can produce a pleasing result, it is also common that middle gray tonality will render the scene too dark or too light.
But you can take control of this. Make a back-of-the-envelope guesstimate as to the natural lightness of the scene you are photographing. If you're in auto or semi-auto exposure mode, dial-in exposure compensation to force the camera to render the scene accurately or with what you consider to be a pleasing lightness. If you shoot in manual exposure mode, choose settings that indicate a tonality matching the lightness of your reference. If you deploy these practices, I think you'll find your photos more consistently have a pleasing appearance.
Capture the light!